ちょうど、このブログとは別に自分用のマイクロブログを作りたいと思っていたので、Go+chi+GAEでクリーンアーキテクチャを試してみました。
この記事では、バックエンド(APIサーバ)部分について記載していきます。ソースコードも公開してますので、細かいところは直接参照ください。
https://github.com/rinoguchi/microblog
使う技術
- バックエンドAPIサーバ
- 実行環境: GAE(Google App Engine)
- Goが使える
- 1日あたり 28 インスタンス時間の無料枠がある
- Dockerイメージすら作らずに、アプリをデプロイ+公開できる
- データベース: supabase
- 500MBまで無料!個人利用なら十分 ※料金体系
- 中身は慣れ親しんだPostgreSQL
作るもの
twitterの劣化版という感じで、コメントを投稿して公開するだけの超絶シンプルなマイクロブログのバックエンドAPIを作ります。
初期段階のAPIのエンドポイントは以下の二つです。
-
post /comments- コメントを投稿する
-
get /comments- コメントを全件取得する
既存のHello WorldアプリをGAEにデプロイ
まずは、公開されている既存の「Hello Worldアプリ」をGAEにデプロイして実行してみることで、開発の流れを把握します。
こちらを読みながら順番にやってみました。
- GCPのプロジェクト作成する
- 課金を有効にする(元々やってあった)
- 「Cloud Build API」を有効にする
- Google Cloud CLI をインストール & 初期化する
# バイナリダウンロード # https://dl.google.com/dl/cloudsdk/channels/rapid/downloads/google-cloud-sdk-370.0.0-darwin-x86_64.tar.gz?hl=ja ./google-cloud-sdk/install.sh ./google-cloud-sdk/bin/gcloud init -
app-engine-goコンポートネントをインストールgcloud components install app-engine-go -
App Engine アプリを初期化
gcloud app create --project=xxx # `asia-northeast1`(東京)を選択 -
Hello WorldアプリをGitからダウンロード
git clone https://github.com/GoogleCloudPlatform/golang-samples.git cd golang-samples/appengine/go11x/helloworld -
App Engine に Hello World をデプロイ
gcloud app deploy -
動作確認
# コマンドでブラウザ起動
gcloud app browse

# curlで確認
curl https://xxx.an.r.appspot.com/
> Hello, World!
サクサクできてとりあえず動くところまで確認できるのはありがたいです。
自前でHello Worldアプリを実装
次は、chi を使って、Hello Worldアプリを作ってみたいと思います。
chi は、軽量で高速でGo標準ライブラリのみに依存するとても薄いWebフレームワークとのことで、クリーンアーキテクチャとは相性が良さそうです。
以下の手順で簡単にアプリ構築+GAEデプロイができました。
-
go.mod
go mod init helloworld -
main.go
package main import ( "net/http" "github.com/go-chi/chi/v5" "github.com/go-chi/chi/v5/middleware" ) func main() { r := chi.NewRouter() r.Use(middleware.RequestID) r.Use(middleware.Logger) r.Use(middleware.Recoverer) r.Get("/", func(w http.ResponseWriter, r *http.Request) { w.Write([]byte("はろー わーるど!")) }) http.ListenAndServe(":8080", r) } -
app.yamlを作成runtime: go116 - 依存関係を解決
go mod tidy - デプロイ
gcloud app deploy - 動作確認
gcloud app browse
> はろー わーるど!
ここまでは結構分かりやすかったです。
クリーンアーキテクチャでAPIを作る
やっと本体を作っていきます。クリーンアーキテクチャでAPIを実装していこうと思います。
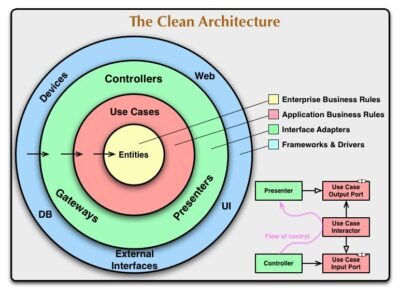
フォルダ構成
フォルダ構成(=パッケージ名)は以下ように、クリーンアーキテクチャの図に出てくる名称を使ってみることにしました。(entitiesあたりは違和感がすごいですが、きっと慣れるでしょう。。。)
.
├── _docs
│   ├── api-schema.yaml
│   ├── chi-server.config.yaml
│   ├── models.config.yaml
│   ├── xorm_reverse.config.gen.yaml
│   └── xorm_reverse.config.yaml
│
├── adapters              # 外界とのインターフェース
│   ├── controllers       # APIリクエストのコントローラー
│   │   ├── models
│   │   │   ├── gen
│   │   │   │   ├── gen.go
│   │   │   │   └── mapper.tmpl
│   │   │   ├── comment_mapper.gen.edt.go
│   │   │   └── models.gen.go
│   │   ├── server.gen.go
│   │   └── server.go
│   │
│   └── repositories      # データをやり取りするリポジトリ。現状裏側はpostgresqlのみ
│       ├── models
│       │   ├── gen
│       │   │   ├── gen.go
│       │   │   ├── goxorm.tmpl
│       │   │   └── mapper.tmpl
│       │   ├── models.go
│       │   └── models_mapper.gen.edt.go
│       ├── comment_repository.go
│       └── db.go
│
├── usecases              # アプリケーションのユースケースを表現
│   ├── models
│   │   ├── gen
│   │   │   ├── gen.go
│   │   │   └── model.tmpl
│   │   └── comment.gen.edt.go
│   ├── comment_usecase.go
│   └── models.gen.go
│
├── entities              # コアなデータ構造およびデータ変更を行う
│   └── comment.go
│
├── utils                 # 全レイヤーからアクセス可能なutility
│   ├── gen_utils.go
│   └── string_utils.go
│
├── Makefile
├── README.md
├── app.yaml
├── env.yaml
├── go.mod
├── go.sum
├── main.go
├── wire.go
└── wire_gen.go
コード自動生成について
非常にシンプルなアプリなのにクリーンアーキテクチャを採用しているので、各レイヤーでのモデル定義、詰め替え処理など、とても無駄が多くなります。なので、自動で生成できるものはできるだけ自動生成するようにします。
- ファイル名に
.genとついているものは、自動生成したもの -
.gen.edtとついているものは、自動生成したけど後で編集できるもの- 1行目に
// DO NOT OVERWRITEと記載することで、次回以降上書きされない
- 1行目に
`go generateに関しては、以下の記事を書いたのでそちらで使い方を参照ください。
https://rinoguchi.net/2022/09/go-generate.html
Entitiesを実装
この層では、アプリケーションに寄らないドメインモデルとリポジトリのインターフェースを定義します。
現時点ではドメインモデルは振る舞いを持ってませんが、いずれ持たせることになるかもしれません。
ドメインモデルが持つ振る舞いは、ドメインモデルのデータの中身を変更する様な処理と考えています。
entities/comment.go
package entities

import (
    "context"
    "time"
)

type CommentEntity struct {
    Id        *int64
    Text      string
    CreatedAt *time.Time
    UpdatedAt *time.Time
}

type CommentRepository interface {
    FindAll(ctx context.Context) ([]CommentEntity, error)
    Add(ctx context.Context, comment CommentEntity) (CommentEntity, error)
}現時点では、CommentEntityは振る舞いは持ってないですが、今後追加する可能性もあります。
CommentRepositoryは別ファイルに分けても良かったですが、ドメインモデルのデータを扱うリポジトリは同じファイルに存在する方がわかりやすい気がするので、同じファイルにしてあります。
UseCasesを実装
この層では、アプリケーション固有のユースケースを実装します。
今回は、「コメント一覧を取得する」「コメントを登録する」というユースケースを記載しています
この層はUseCases層とEntities層のみに依存し、外側の層には依存しません。
Usecasesのモデルは自動生成しました。UsecasesのモデルとEntities(ドメイン)のモデルのマッパーも合わせて自動生成しています。
usecases/models/comment.gen.edt.go
usecases/models/gen/gen.goで自動生成しています。
// Code generated by go generate DO NOT EDIT.
// If you edit this file, write "// DO NOT OVERWRITE" on the first line.

package usecases

import (
    "github.com/rinoguchi/microblog/entities"
    "time"
)

type UComment struct {
    CreatedAt *time.Time
    Id        *int64
    Text      string
    UpdatedAt *time.Time
}

func (uComment UComment) ToCommentEntity() entities.CommentEntity {
    return entities.CommentEntity{
        CreatedAt: uComment.CreatedAt,
        Id:        uComment.Id,
        Text:      uComment.Text,
        UpdatedAt: uComment.UpdatedAt,
    }
}

func FromCommentEntity(comment entities.CommentEntity) UComment {
    return UComment{
        CreatedAt: comment.CreatedAt,
        Id:        comment.Id,
        Text:      comment.Text,
        UpdatedAt: comment.UpdatedAt,
    }
}
アプリケーションのユースケースを実装しています。
Entities(ドメイン)層に定義したRepositoryのインターフェースを通じてデータを取得して返却しているだけです。
usecases/comment_usecase.go
package usecases

import (
    "context"

    "github.com/rinoguchi/microblog/entities"
    usecases "github.com/rinoguchi/microblog/usecases/models"
)

type CommentUsecase struct {
    commentRepository entities.CommentRepository
}

func NewCommentUsecase(
    commentRepository entities.CommentRepository,
) CommentUsecase {
    return CommentUsecase{
        commentRepository: commentRepository,
    }
}

func (c CommentUsecase) FindAllComment(ctx context.Context) ([]usecases.UComment, error) {
    commentEntities, err := c.commentRepository.FindAll(ctx)
    if err != nil {
        return nil, err
    }
    uComments := []usecases.UComment{}
    for _, commentEntity := range commentEntities {
        uComments = append(uComments, usecases.FromCommentEntity(commentEntity))
    }
    return uComments, nil
}

func (c CommentUsecase) AddComment(ctx context.Context, uComment usecases.UComment) (usecases.UComment, error) {
    commentEntity, err := c.commentRepository.Add(ctx, entities.CommentEntity{
        Text: uComment.Text,
    })
    if err != nil {
        return usecases.UComment{}, err
    }
    return usecases.FromCommentEntity(commentEntity), nil
}
ちなみに、正直このレイヤーは今回のようなシンプルなアプリの場合は、無駄なモデルの変換を行なっているだけでコード量が増えただけで、controllersとusecasesを分ける意味はほとんど無いように感じましたw
Controllersを実装
ここは、HTTPリクエストをハンドリングするだけの層です。
まずは、HTTPリクエスト用のモデルをAPIスキーマから oapi-codegen を使って自動生成しました。
/adapters/controllers/models/models.gen.go
// Package controllers provides primitives to interact with the openapi HTTP API.
//
// Code generated by github.com/deepmap/oapi-codegen version v1.11.0 DO NOT EDIT.
package controllers

import (
    "time"
)

// Comment defines model for Comment.
type Comment struct {
    CreatedAt *time.Time `json:"created_at,omitempty"`
    Id        *int64     `json:"id,omitempty"`
    Text      string     `json:"text"`
    UpdatedAt *time.Time `json:"updated_at,omitempty"`
}

// CommonProps defines model for CommonProps.
type CommonProps struct {
    CreatedAt *time.Time `json:"created_at,omitempty"`
    Id        *int64     `json:"id,omitempty"`
    UpdatedAt *time.Time `json:"updated_at,omitempty"`
}

// Error defines model for Error.
type Error struct {
    Message string `json:"message"`
}

// NewComment defines model for NewComment.
type NewComment struct {
    Text string `json:"text"`
}

// AddCommentJSONBody defines parameters for AddComment.
type AddCommentJSONBody = NewComment

// AddCommentJSONRequestBody defines body for AddComment for application/json ContentType.
type AddCommentJSONRequestBody = AddCommentJSONBody
次に、自前で go generator を使って、controller モデルと cusecase モデルのマッパーも自動生成しました。
/adapters/controllers/models/comment_mapper.gen.edt.go
/adapters/controllers/models/gen/gen.goで自動生成しています。
// Code generated by go generate DO NOT EDIT.
// If you edit this file, write "// DO NOT OVERWRITE" on the first line.

package controllers

import usecases "github.com/rinoguchi/microblog/usecases/models"

func (comment Comment) ToUComment() usecases.UComment {
    return usecases.UComment{
        CreatedAt: comment.CreatedAt,
        Id:        comment.Id,
        Text:      comment.Text,
        UpdatedAt: comment.UpdatedAt,
    }
}

func FromUComment(uComment usecases.UComment) Comment {
    return Comment{
        CreatedAt: uComment.CreatedAt,
        Id:        uComment.Id,
        Text:      uComment.Text,
        UpdatedAt: uComment.UpdatedAt,
    }
}
今回は、Webフレームワークとして chi を利用していますので、APIスキーマから oapi-codegen を使って、chi用のハンドラのインターフェースを自動生成しました。
※ 詳細は 別記事 参照
/adapters/controllers/server.gen.go(自動生成、一部抜粋)
ServerInterfaceインターフェースでGetComment()とAddCommentというハンドラが定義されています。
package controllers

// ServerInterface represents all server handlers.
type ServerInterface interface {

    // (GET /comments)
    GetComments(w http.ResponseWriter, r *http.Request)

    // (POST /comments)
    AddComment(w http.ResponseWriter, r *http.Request)
}

// ServerInterfaceWrapper converts contexts to parameters.
type ServerInterfaceWrapper struct {
    Handler            ServerInterface
    HandlerMiddlewares []MiddlewareFunc
    ErrorHandlerFunc   func(w http.ResponseWriter, r *http.Request, err error)
}

// GetComments operation middleware
func (siw *ServerInterfaceWrapper) GetComments(w http.ResponseWriter, r *http.Request) {
    ctx := r.Context()

    var handler = func(w http.ResponseWriter, r *http.Request) {
        siw.Handler.GetComments(w, r)
    }

    for _, middleware := range siw.HandlerMiddlewares {
        handler = middleware(handler)
    }

    handler(w, r.WithContext(ctx))
}

// AddComment operation middleware
func (siw *ServerInterfaceWrapper) AddComment(w http.ResponseWriter, r *http.Request) {
    ctx := r.Context()

    var handler = func(w http.ResponseWriter, r *http.Request) {
        siw.Handler.AddComment(w, r)
    }

    for _, middleware := range siw.HandlerMiddlewares {
        handler = middleware(handler)
    }

    handler(w, r.WithContext(ctx))
}
最後に、上記で作成されたインターフェースを実装しました。
/adapters/controllers/server.go
Serverという構造体が、自動生成されたServerInterfaceを実装したものです。この構造体にGetComments()とAddComment()を実装してあります。
package controllers

import (
    "context"
    "encoding/json"
    "net/http"

    controllers "github.com/rinoguchi/microblog/adapters/controllers/models"
    "github.com/rinoguchi/microblog/adapters/repositories"
    "github.com/rinoguchi/microblog/usecases"
)

type Server struct {
    commentUsecase usecases.CommentUsecase
}

func NewServer(commentUsecase usecases.CommentUsecase) *Server {
    return &Server{
        commentUsecase: commentUsecase,
    }
}

func (s *Server) GetComments(w http.ResponseWriter, r *http.Request) {
    ctx := context.WithValue(r.Context(), repositories.DbKey, repositories.GetDb())
    uComments, err := s.commentUsecase.FindAllComment(ctx)
    if err != nil {
        handleError(w, err)
        return
    }

    var comments []controllers.Comment
    for _, uComment := range uComments {
        comments = append(comments, controllers.FromUComment(uComment))
    }

    w.Header().Set("Content-Type", "application/json; charset=UTF-8")
    w.WriteHeader(http.StatusOK)
    json.NewEncoder(w).Encode(comments)
}

func (s *Server) AddComment(w http.ResponseWriter, r *http.Request) {
    ctx := context.WithValue(r.Context(), repositories.DbKey, repositories.GetDb())

    var comment controllers.Comment
    if err := json.NewDecoder(r.Body).Decode(&comment); err != nil {
        handleError(w, err)
        return
    }

    uComment, err := s.commentUsecase.AddComment(ctx, comment.ToUComment())
    if err != nil {
        handleError(w, err)
        return
    }

    w.Header().Set("Content-Type", "application/json; charset=UTF-8")
    w.WriteHeader(http.StatusOK)
    json.NewEncoder(w).Encode(controllers.FromUComment(uComment))
}

func handleError(w http.ResponseWriter, err error) {
    w.WriteHeader(http.StatusInternalServerError)
    w.Write([]byte(http.StatusText(http.StatusInternalServerError)))
}
データベース準備
Repositoriesを実装する前に、データベースを準備してなかったので、supabaseを利用してPostgreSQLのDBを立てます。
supabaseは500MBまでは無料みたいなので、今回の用途であれば十分です^^
データベース作成
以下を実行するだけでデータベースを作成できました。
- https://supabase.com/ を開く
-
Start your projectから開始 -
SignIn with GitHubからサインイン -
New Projectからプロジェクトを作成 - Database名、パスワード、Region(
asia-east-1) などを入力
クレジットカードなどを登録する必要がない**ので、気軽にDBを作成できるのが嬉しいです(^^)
timezone変更
デフォルトのtimezoneはUTCなので、Asia/Tokyoに変更しました。
SQLはSQL Editorで実行できます。
-- 確認
show timezone;
-- 変更
alter database postgres
set timezone to 'Asia/Tokyo';
アプリ接続用ユーザ作成
アプリからDBに接続する時に利用するユーザを作成しました。
-- ユーザ作成
create user microblog_app
password '**********';

-- スキーマ自体へのアクセス権限付与
grant all on schema public to microblog_app;

-- publicスキーマの各種オブジェクトへのデフォルト権限の付与
alter default privileges in schema public grant all on tables to microblog_app;
alter default privileges in schema public grant all on sequences to microblog_app;
alter default privileges in schema public grant all on functions to microblog_app;
テーブル作成
コメントを保存するテーブルを作成しました。
create table comment (
  id bigint generated by default as identity primary key,
  text text,
  created_at timestamp with time zone default (now() at time zone 'jst') not null,
  updated_at timestamp with time zone default (now() at time zone 'jst') not null
);
psqlで接続
裏側はただのPostgreSQLなので、普通にpsqlで接続できます。
接続情報は、Settings > Database > Connection Infoに記載されています。
接続ユーザは先ほど作ったmicroblog_app を利用しました。
$ psql -h db.xxxxxxxxxxxx.supabase.co -p 5432 -d postgres -U microblog_app
Password for user microblog_app:
psql (14.2, server 14.1)
SSL connection (protocol: TLSv1.3, cipher: TLS_AES_256_GCM_SHA384, bits: 256, compression: off)
Type "help" for help.

postgres=> \dt
             List of relations
 Schema |   Name   | Type  |     Owner
--------+----------+-------+----------------
 public | comment | table | supabase_admin
(1 row)

postgres=> select * from comment;
 id | text | created_at | updated_at
----+------+------------+------------
(0 rows)

postgres=> insert into comment(text) values('dummy text');
INSERT 0 1
postgres=> select * from comment;
 id |    text    |          created_at           |          updated_at
----+------------+-------------------------------+-------------------------------
  2 | dummy text | 2022-07-31 11:53:16.830773+09 | 2022-07-31 11:53:16.830773+09
(1 row)

postgres=> drop table comment;
ERROR:  must be owner of table comment
postgres=> \q
無事に接続できました。
DMLは実行できて、DDLは実行できないようになってるので、想定通りです。
Repositoriesの実装
モデルの自動生成
RepositoryモデルをDBスキーマから自動生成したいと思います。
ここは xorm/reserve を使って実現しました。
まずはインストールします。
go get xorm.io/reverse/adapters/repositories/models/gen/goxorm.tmpl
Model出力用のテンプレートファイルです。出力したい内容になるようにテンプレートを作成します。
// Code generated by xorm/reverse generate DO NOT EDIT.
package repositories

{{$ilen := len .Imports}}
{{if gt $ilen 0}}
import (
    {{range .Imports}}"{{.}}"{{end}}
  "github.com/uptrace/bun"
)
{{end}}

{{range .Tables}}
type Db{{ (TableMapper .Name) }} struct {
bun.BaseModel `bun:"table:{{ .Name }},alias:{{ slice .Name 0 1 }}"`

{{$table := .}}
{{range .ColumnsSeq}}{{$col := $table.GetColumn .}} {{ColumnMapper $col.Name}}  {{if (eq (ColumnMapper $col.Name) "Id")}}*{{end}}{{if (eq (ColumnMapper $col.Name) "CreatedAt")}}*{{end}}{{if (eq (ColumnMapper $col.Name) "UpdatedAt")}}*{{end}}{{Type $col}} `bun:"{{$col.Name}}{{if (eq (ColumnMapper $col.Name) "Id")}},pk{{end}}"`
{{end}}
}

{{end}}
さらに、実行用の設定ファイルを作成します。
_docs/xorm_reverse.config.gen.yaml
kind: reverse
name: microblog
source:
  database: postgres
  conn_str: "postgresql://microblog_app:******@db.******.supabase.co:5432/postgres"
targets:
  - type: codes
    language: golang
    output_dir: adapters/repositories/models
    template_path: adapters/repositories/models/gen/goxorm.tmpl
テンプレートを実装したら、自動生成を実行します。
reverse -f _docs/xorm_reverse.config.gen.yaml/adapters/repositories/models/models.go
想定通りの内容が自動生成されていました。
// Code generated by xorm/reverse generate DO NOT EDIT.
package repositories

import (
    "github.com/uptrace/bun"
    "time"
)

type DbComment struct {
    bun.BaseModel `bun:"table:comment,alias:c"`

    Id        *int64     `bun:"id,pk"`
    Text      string     `bun:"text"`
    CreatedAt *time.Time `bun:"created_at"`
    UpdatedAt *time.Time `bun:"updated_at"`
}
モデルマッパーの実装
Repository モデルを Entity(ドメイン) モデルに変換するマッパーが必要なのですが、こちらも go generate で自動生成しました。
/adapters/repositories/models/models_mapper.gen.edt.go
/adapters/repositories/models/gen/gen.goで自動生成しています。
// Code generated by go generate DO NOT EDIT.
// If you edit this file, write "// DO NOT OVERWRITE" on the first line.

package repositories

import "github.com/rinoguchi/microblog/entities"

func (dbComment DbComment) ToCommentEntity() entities.CommentEntity {
    return entities.CommentEntity{
        Id:        dbComment.Id,
        Text:      dbComment.Text,
        CreatedAt: dbComment.CreatedAt,
        UpdatedAt: dbComment.UpdatedAt,
    }
}

func FromCommentEntity(comment entities.CommentEntity) DbComment {
    return DbComment{
        Id:        comment.Id,
        Text:      comment.Text,
        CreatedAt: comment.CreatedAt,
        UpdatedAt: comment.UpdatedAt,
    }
}
DB接続部分を実装
今回は、PostgreSQL用にアクセスするためのclientは、bunを利用してみようと思います。
ライブラリインストール
go get github.com/uptrace/bun
go get github.com/uptrace/bun/dialect/pgdialect
go get github.com/uptrace/bun/driver/pgdriver@v1.1.5
※ GAEはgo1.16までしか対応しておらず、最新バージョンのpgdriverだと、以下のエラーが発生するため少し前のバージョンを利用しています。
go get github.com/uptrace/bun/driver/pgdriver
> # github.com/uptrace/bun/driver/pgdriver
> ../../go/1.16.13/pkg/mod/github.com/uptrace/bun/driver/pgdriver@v1.1.7/proto.go:125:17: tlsCN.HandshakeContext undefined (type *tls.Conn has no field or method HandshakeContext)
> note: module requires Go 1.17
DBパラメータを環境変数に設定
ローカル実行環境向けは、.envrcに設定してdirenvで読み込むことにしました。
.envrc
export DB_ADDRESS=db.****.supabase.co:****
export DB_USER=****
export DB_PASSWORD=****
export DB_NAME=****
export DB_APPLICATION_NAME=****GAEデプロイ時にapp.yamlで環境変数を指定することにしました。
直接記載するとGit管理下に含まれるので、env.yamlに外出しし、Git管理対象外としました。
app.yaml
runtime: go116
includes:
  - env.yaml
env.yaml
env_variables:
  "DB_ADDRESS": "db.****.supabase.co:****"
  "DB_USER": "****"
  "DB_PASSWORD": '****"'
  "DB_NAME": "****"
  "DB_APPLICATION_NAME": "****"
DB接続アダプター
db.goでPostgreSQLに接続するためのアダプター(ミドルウェア)を作成します。
必要な情報は環境変数から取得する形にしてあります。
/adapters/repositories/db.go
package repositories

import (
    "crypto/tls"
    "database/sql"
    "os"
    "time"

    "github.com/uptrace/bun"
    "github.com/uptrace/bun/dialect/pgdialect"
    "github.com/uptrace/bun/driver/pgdriver"
    "github.com/uptrace/bun/extra/bundebug"
)

// コンテキスト追加用のキー
type dbKey int

const DbKey dbKey = iota

func GetDb() *bun.DB {

    pgconn := pgdriver.NewConnector(
        pgdriver.WithNetwork("tcp"),
        pgdriver.WithAddr(os.Getenv("DB_ADDRESS")),
        pgdriver.WithTLSConfig(&tls.Config{InsecureSkipVerify: true}),
        pgdriver.WithUser(os.Getenv("DB_USER")),
        pgdriver.WithPassword(os.Getenv("DB_PASSWORD")),
        pgdriver.WithDatabase(os.Getenv("DB_NAME")),
        pgdriver.WithApplicationName(os.Getenv("DB_APPLICATION_NAME")),
        pgdriver.WithTimeout(5*time.Second),
        pgdriver.WithDialTimeout(5*time.Second),
        pgdriver.WithReadTimeout(5*time.Second),
        pgdriver.WithWriteTimeout(5*time.Second),
    )

    pgdb := sql.OpenDB(pgconn)

    // Create a Bun db on top of it.
    db := bun.NewDB(pgdb, pgdialect.New())

    // Print all queries to stdout.
    db.AddQueryHook(bundebug.NewQueryHook(bundebug.WithVerbose(true)))

    return db
}
Controllerでcontextにdb追加
同じリクエストは同一のDB接続を使い回すために、controller側でDBに接続し、contextに突っ込んで使い回すことにしました。(本当はミドルウェアを使う方が良さそうなので、後日修正すると思います...)
実装は、Context|GORM という記事を参考にしてます。
server.go(一部抜粋)
func (s *Server) GetComments(w http.ResponseWriter, r *http.Request) {
    ctx := context.WithValue(r.Context(), repositories.DbKey, repositories.GetDb())
    uComments, err := s.commentUsecase.FindAllComment(ctx)
    if err != nil {
        handleError(w, err)
        return
    }

    var comments []controllers.Comment
    for _, uComment := range uComments {
        comments = append(comments, controllers.FromUComment(uComment))
    }

    w.Header().Set("Content-Type", "application/json; charset=UTF-8")
    w.WriteHeader(http.StatusOK)
    json.NewEncoder(w).Encode(comments)
}
Repositoriesの実装
やとRepository本体を実装できます。。
contextからDB接続を取り出して、SelectやInsertを実行しています。
comment_repository.go
package repositories

import (
    "context"

    repositories "github.com/rinoguchi/microblog/adapters/repositories/models"
    "github.com/rinoguchi/microblog/entities"
    "github.com/uptrace/bun"
)

type CommentRepositoryImpl struct {
}

func NewCommentRepositoryImpl() entities.CommentRepository {
    return CommentRepositoryImpl{}
}

func (c CommentRepositoryImpl) Add(ctx context.Context, commentEntity entities.CommentEntity) (entities.CommentEntity, error) {
    dbComment := repositories.FromCommentEntity(commentEntity)
    db := ctx.Value(DbKey).(*bun.DB)
    _, err := db.NewInsert().Model(&dbComment).Exec(ctx)
    if err != nil {
        return entities.CommentEntity{}, err
    }
    return dbComment.ToCommentEntity(), nil
}

func (c CommentRepositoryImpl) FindAll(ctx context.Context) ([]entities.CommentEntity, error) {
    var dbComments []repositories.DbComment
    db := ctx.Value(DbKey).(*bun.DB)
    err := db.NewSelect().Model(&dbComments).Scan(ctx)
    if err != nil {
        return nil, err
    }

    commentEntities := make([]entities.CommentEntity, len(dbComments))
    for i, commentRecord := range dbComments {
        commentEntities[i] = commentRecord.ToCommentEntity()
    }
    return commentEntities, nil
}
動作確認
ここまででやっと一通り実装完了しましたので、動作確認したいと思います。
ローカル環境での動作確認
まずはアプリケーションを起動して
go run .
> main started
> starting server port:8080
curlでAPIを呼び出してみます。
# コメント追加
curl -X POST -H "Content-Type: application/json" -d '{"text" : "あいうえお"}' http://localhost:8080/comments
> {"created_at":"2022-08-13T17:44:44.616795+09:00","id":19,"text":"あいうえお","updated_at":"2022-08-13T17:44:44.616795+09:00"}

curl -X POST -H "Content-Type: application/json" -d '{"text" : "かきくけこ"}' http://localhost:8080/comments
> {"created_at":"2022-08-13T17:45:19.954428+09:00","id":20,"text":"かきくけこ","updated_at":"2022-08-13T17:45:19.954428+09:00"}

# コメント全件取得
curl http://localhost:8080/comments
> [{"created_at":"2022-08-13T17:44:44.616795+09:00","id":19,"text":"あいうえお","updated_at":"2022-08-13T17:44:44.616795+09:00"},{"created_at":"2022-08-13T17:45:19.954428+09:00","id":20,"text":"かきくけこ","updated_at":"2022-08-13T17:45:19.954428+09:00"}]
無事動いてくれました。
GAEでの動作確認
GAEにデプロイします。
gcloud app deploy
> Services to deploy:
>
> descriptor:                  [/Users/xxx/workplace/microblog/app.yaml]
> source:                      [/Users/xxx/workplace/microblog]
> target project:              [microblog-999]
> target service:              [default]
> target version:              [20220813t999]
> target url:                  [https://xxx-xxx.xx.x.appspot.com]
> target service account:      [App Engine default service account]
>
> Do you want to continue (Y/n)?  Y
>
> Beginning deployment of service [default]...
>
> File upload done.
> Updating service [default]...done.
> Setting traffic split for service [default]...done.
> Deployed service [default] to [https://xxx-xxx.xx.x.appspot.com]
次に、curlで同じようにAPIを呼び出してみました。
# コメント追加
curl -X POST -H "Content-Type: application/json" -d '{"text" : "さしすせそ"}' https://xxx-xxx.xx.x.appspot.com/comments
> {"created_at":"2022-08-13T17:54:26.284776+09:00","id":21,"text":"さしすせそ","updated_at":"2022-08-13T17:54:26.284776+09:00"}

# コメント全件取得
curl https://xxx-xxx.xx.x.appspot.com/comments
> [{"created_at":"2022-08-13T17:44:44.616795+09:00","id":19,"text":"あいうえお","updated_at":"2022-08-13T17:44:44.616795+09:00"},{"created_at":"2022-08-13T17:45:19.954428+09:00","id":20,"text":"かきくけこ","updated_at":"2022-08-13T17:45:19.954428+09:00"},{"created_at":"2022-08-13T17:54:26.284776+09:00","id":21,"text":"さしすせそ","updated_at":"2022-08-13T17:54:26.284776+09:00"}]
こちらも問題なく動いてくれました!
これにて今回の記事は終了にしようと思います。
最後に
今回マイクロブログのバックエンドAPIサーバを以下の技術を使ってクリーンアーキテクチャで作ってみました。
- Golang
- chi
- OpenAPI
- GAE
- PostgreSQL(supbase)
エラーハンドリング、validation、transaction管理、、などまだまだ課題がありそうですが、とりあえずはなんとかやっていけそうな感触を得られてよかったです。
なお、ソースコードは以下で公開しています。
https://github.com/rinoguchi/microblog