Kotlin / Ktorでサンプルプログラムを書いていて、Google OAuth認証を実装したのだが、だいたい実装完了したタイミングで、 公式ページ を発見してしまい、このコードはお蔵入りになることが決定した(涙)。
サーバサイド含めて1日ぐらい格闘していたので、ただ捨てるのも忍びなくここに記載しておく。
シーケンス図
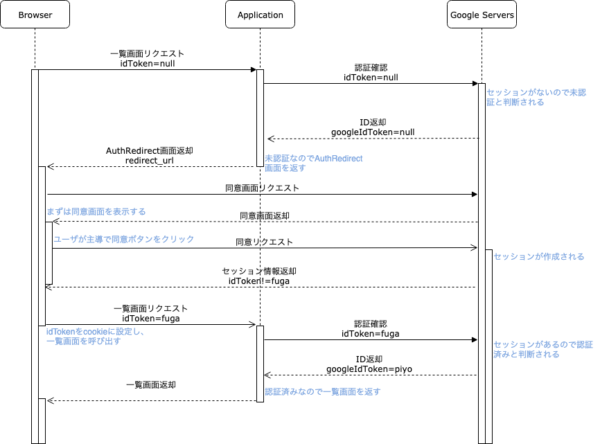
上記のシーケンス図の通り実装したが、全部書くのも大変なので、以下の2点だけ記載しようと思う。
- ApplicationからGoogle Serversに対して認証済みかどうかを確認する処理
- AuthRedirect画面の実装
Google APIsでOAuth 認証用のプロジェクトを作成
- プロジェクトを作成する
-
https://console.developers.google.com にてプロジェクトを作成する。今回は
Kotlin Ktor Sampleという名前で作成する。
-
https://console.developers.google.com にてプロジェクトを作成する。今回は
- OAuth 同意画面の設定を行う
- アプリケーション名とメールアドレスを設定して、保存ボタンを押せば良い。

- アプリケーション名とメールアドレスを設定して、保存ボタンを押せば良い。
- 認証情報の作成を行う
- OAuth クライアントIDを選択する
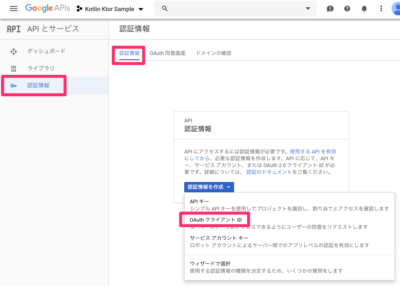
- OAuth クライアントIDを選択する
- OAuth クライアントIDの作成を行う
- ウェブアプリケーションを選択、「名前」「承認済みの JavaScript 生成元」を設定し、作成ボタンを押す
- 今回は、Webサーバでリダイレクト処理を行わないため「承認済みのリダイレクト URI」は設定しなくて良い

- クライアントIDとクライアントシークレットが作成される
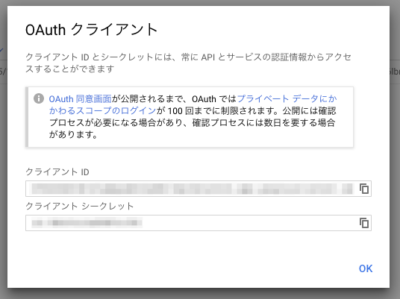
- ライブラリは特に何も有効化してない
ApplicationからGoogle Serversに対して認証済みかどうかを確認する処理
Authentication.kt に認証処理を実装する
ポイントは、未認証だったらAuthenticationExceptionをthrowしているところ。
package sample

fun Application.authenticate(idTokenString: String) {
    val clientId = environment.config.property("app.google.client_id").getString() // ここでconfigから値を取得したいので、Applicationに関数を生やしている
    authenticateByGoogle(idTokenString, clientId)

    // こんな感じでアカウントの情報を取得できる
    // val idToken: GoogleIdToken = authenticateByGoogle(idTokenString, clientId)
    // val payload: GoogleIdToken.Payload = idToken.payload
    // val subject: String = payload.subject
    // val email: String = payload.email
}

private fun authenticateByGoogle(idTokenString: String, clientId: String): GoogleIdToken {
    val transport = NetHttpTransport()
    val jsonFactory = JacksonFactory.getDefaultInstance()
    val verifier: GoogleIdTokenVerifier = GoogleIdTokenVerifier
        .Builder(transport, jsonFactory)
        .setAudience(Collections.singletonList(clientId))
        .build()

    // 確認結果がnullの場合はAuthenticationExceptionをthrowしている
    return verifier.verify(idTokenString) ?: throw AuthenticationException()
}
AuthenticationException をcatchしたらAuthRedirect画面にredirectする処理を statusPages に追加する
    :
    // StatusPagesを設定
    install(StatusPages) {
        data class ErrorResponse(val message: String?)
        :
        exception<AuthenticationException> {
            call.respondRedirect("http://localhost:8080/static/authRedirect.html")
            call.respond(HttpStatusCode.Unauthorized)
        }
        exception<Throwable> {
            it.printStackTrace()
            call.respond(HttpStatusCode.InternalServerError, ErrorResponse(it.message))
        }
    }
    :
AuthRedirect画面(authRedirect.html)の実装
Google Sign-In JavaScript client reference を参照しながら実装した。
<!DOCTYPE html>
<html lang="en">
<head>
    <meta charset="UTF-8">
    <title>Google OAuth Redirect | Sample</title>
</head>
<body>
    <script src="https://apis.google.com/js/platform.js?onload=init" async defer></script>
    <script>
    function init() {
        var redirectUrl = "http://localhost:8080/contents/"; // 実際はFreeMarker経由でリダイレクト先のURLを受け取り設定する

        gapi.load('auth2', function() {
            var config = {
                client_id: 'xxxxx.apps.googleusercontent.com', // 実際はFreeMarker経由で環境変数から値を取得する
                scope: 'profile email',
                response_type: 'id_token'
            };

            // OAuth同意画面をポップアップ表示して認証を行う
            gapi.auth2.authorize(config, function(response) {
                if (response.error) {
                    alert('Error Occurred!!'); // 実際はエラーの種類は判別できるのでメッセージを変える方がよさそう
                    return;
                }

                // idTokenをcookieに設定する
                var idToken = response.id_token;
                document.cookie = "idToken=" + idToken + "; path=/; max-age=86400"; // とりあえず1日

                // 元々表示しようとしていた画面にリダイレクトする
                window.location.href = redirectUrl;
            });
        });
    }
    </script>
</body>
</html>