任意のWEBサイトに自分用のメモを残すことができる Chrome Extension を作って公開しました。
plaintextモード or markdownモードでメモを取ることができます。よければ使ってみてください。
この記事では、このChrome拡張開発のコアな部分が出来上がるまでについて紹介していこうと思います。
Web Storeリンク
https://chrome.google.com/webstore/detail/memorun/lhkibcggoojcpjmigjohdlgfgjdbjkpb
紹介動画
使用している技術
- Chrome Extension
- Vue.js + Vuetify
- TypeScript
- Firebase
- Authentication
- Cloud Firestore
- Cloud Function(この記事では出てきません)
Vue.jsを使ったChrome Extensionの雛形作成
ゼロから構築しようかと思ったのですが、そもそもChrome拡張のことをよく分かっておらず、標準的な構成を知るためにも、 vue-web-exetnsion を使ってプロジェクトを作成をすることにしました。
npmインストール
こちら を参考に、npmをインストールします。
vue-cliのインストール
vue-web-extensionはvue-cliが事前にインストールされている必要がありますので、vue-cliをインストールします。
npm install -g @vue/cli
npm install -g @vue/cli-init
テンプレートプロジェクト作成
1コマンドでテンプレートプロジェクトが作成されます。TypeScriptを指定することができないので、この時点ではJavaScriptが出力されます。
vue init kocal/vue-web-extension memorun_extension

? Project name memorun_extension
? Project description A Extension to take a memo.
? Author rinoguchi
? License
? Use Mozilla's web-extension polyfill? (https://github.com/mozilla/webextension-polyfill) Yes
? Provide an options page? (https://developer.chrome.com/extensions/options) Yes
? Install vue-router? No
? Install vuex? No
? Install axios? No
? Install ESLint? Yes
? Pick an ESLint preset Standard
? Install Prettier? No
? Automatically install dependencies? npm
プロジェクトフォルダに移動して、development用にExtensionをbuildします。
cd memorun_extension
npm run build:devこれにより、/dist/にExtensionコードが出力されます。
開発中の拡張機能を動作させる
chrome://extensions/
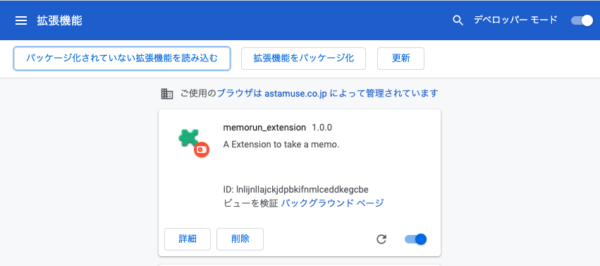
にアクセスし、右上のデベロッパーモードをONにすると、パッケージ化されていない拡張機能を読み込むボタンが表示されます。
そのボタンをクリックし、さきほど作成されたdistフォルダを指定すると、開発中の拡張機能がインストールされます。
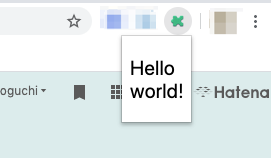
拡張機能のアイコンをクリックすると、「Hello world!」と表示されます。
Hot Reload
vue-web-extensionで作ったプロジェクトでは、npm run watch:devで変更を検知してリランしてくれます。さらに、webpack-extension-reloaderを使って、ブラウザに登録しているExtensionを更新してくれます。
これを毎回手作業でやるのはやる気が起きなかったのでとても助かります。
TypeScript化
vue-cliでTypeScriptのプロジェクトを作成してみて、差分を比較しながらTypeScript化していきました。変更/追加したファイルの変更点を列挙していきます。
package.json
-
webextension-polyfillは、W3 Browser Extensions groupで標準化されたWebExtension APIを使用するExtensionを、最小限の変更で各ブラウザ上で動かすためのものらしいですが、これはTypeScript版に変えています - class-style syntaxでVue Componentを記載できるようにするためにvue-class-componentを、propsなどをデコレータで記載できるようにするためにvue-property-decoratorをインストールしています。
- vue-property-decoratorはvue-class-componentに依存しているためpackage.jsonには記載不要
-
Class APIはVue 3のRFCから落ちたため、Vue 3にバージョンアップする際は変更が必要
   "dependencies": {
-    "webextension-polyfill": "^0.3.1"
+    "webextension-polyfill-ts": "^0.15.0",
+    "vue-property-decorator": "^8.4.2"
   },
  "devDependencies": {
+    "ts-loader": "^7.0.2",
+    "typescript": "^3.8.3"
  },
webpack.config.js
- entryのファイル名を
*.jsを*.tsに変更しています - import文で拡張子を書かなくて済むようにresolveに
.tsを追加します -
ts-loaderでTypeScriptをcompileします。また、.vueをtsモジュールとしてcompile対象にしていますconst config = { entry: { - 'background': './background.js', - 'popup/popup': './popup/popup.js', - 'options/options': './options/options.js', + 'background': './background.ts', + 'popup/popup': './popup/popup.ts', + 'options/options': './options/options.ts', }, output: { path: __dirname + '/dist', filename: '[name].js', }, resolve: { - extensions: ['.js', '.vue'], + extensions: ['.js', '.vue', '.ts'], }, module: { rules: [ { test: /\.vue$/, loader: 'vue-loader', }, + { + test: /\.ts$/, + use: [ + { + loader:'ts-loader', + options: { + appendTsSuffixTo: [/\.vue$/] + } + } + ], + exclude: /node_modules/ + }, ] }
tsconfig.json
- typescriptのcompile設定です。基本はVue.jsの推奨構成に合わせてあります
-
experimentalDecoratorsはvue-property-decoratorを使ったデコレーションでワーニングが発生しないようにするためのオプションです{ "compilerOptions": { "target": "es5", "strict": true, "module": "es2015", "moduleResolution": "node", "experimentalDecorators": true, } }
shims-vue.d.ts
eslintでCannot find moduleエラーが出ることを回避する目的で追加しています。
declare module '*.vue' {
  import Vue from 'vue'
  export default Vue
}
App.vue
- ほぼ同じ実装のpopup/App.vueとoptions/App.vueがありますが、同様に変更します。
-
Vueインターフェースを継承する形でclassを定義し、@Componentで装飾しています。もともと
data()で管理してたプロパティはclassプロパティとして定義します(今回はmessageというプロパティを追加してますが)。<template> <div> - <p>Hello world!</p> + <p>{{ message }}</p> </div> </template> -<script> -export default { - data () { - return {} - } +<script lang="ts"> +import { Component, Vue } from 'vue-property-decorator' + +@Component +export default class App extends Vue { + message = 'Hello world with TypeScript!' } </script>
popup.ts, options.ts
- 拡張子を
*.jsから*.tsに変更して、型を記載します -
2ファイルとも同様に、browserオブジェクトをwebextension-polyfill-tsのものに変更します
 import Vue from 'vue'
-import App from './App'
+import App from './App.vue'
+import { browser } from "webextension-polyfill-ts"

-global.browser = require('webextension-polyfill')
-Vue.prototype.$browser = global.browser
+Vue.prototype.$browser = browser

 /* eslint-disable no-new */
 new Vue({
   el: '#app',

-   render: h => h(App)
+  render: (h: CreateElement): VNode => h(App),
 })
background.js
とりあえず、この時点ではやりたい処理もないので、拡張子だけ'.ts'に変えて処理は全削除します。
動作確認
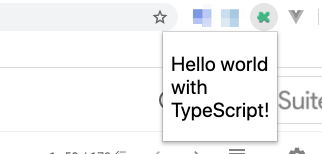
ここまで実装すれば一旦TypeScript化完了です。
ESLintとPrettierの設定
本格的に開発を開始する前に、LinterとFormatterを設定しようと思います。
こちらの記事をありがたく参考にさせていただきつつ、エラーが出たところなどを修正して適用しました。
まずは必要なライブラリを追加します。
npm install --save-dev eslint @typescript-eslint/parser @typescript-eslint/eslint-plugin eslint-plugin-vue
npm install --save-dev prettier eslint-plugin-prettier eslint-config-prettier次にeslintrc.jsの記述を修正します。以下の設定にしてあります。
- 文字列はシングリクォートで囲み、セミコロンは省略する
- prettier側の設定に合わせ、attributeは3つまで1行に記載OK
 module.exports = {
   root: true,
+  parser:  'vue-eslint-parser',
   parserOptions: {
-    parser: 'babel-eslint'
+    parser: '@typescript-eslint/parser'
   },
   env: {
     browser: true,
     webextensions: true,
   },
   extends: [
     // https://github.com/vuejs/eslint-plugin-vue#priority-a-essential-error-prevention
     // consider switching to `plugin:vue/strongly-recommended` or `plugin:vue/recommended` for stricter rules.
-    'plugin:vue/essential',
+    'plugin:vue/recommended',
     // https://github.com/standard/standard/blob/master/docs/RULES-en.md
-    'standard'  ],
+    'standard',
+    'plugin:@typescript-eslint/recommended',
+    'prettier/@typescript-eslint',
+    'plugin:prettier/recommended',
+  ],
   // required to lint *.vue files
   plugins: [
     'vue'
   ],
   // add your custom rules here
   rules: {
     // allow async-await
     'generator-star-spacing': 'off',
     // allow debugger during development
-    'no-debugger': process.env.NODE_ENV === 'production' ? 'error' : 'off'
+    'no-debugger': process.env.NODE_ENV === 'production' ? 'error' : 'off',
+    'prettier/prettier': [
+      'error',
+      {
+        'singleQuote': true,
+        'semi': false
+      }
+    ],
+    "vue/max-attributes-per-line": ["error", {
+      "singleline": 3,
+    }],
   }
 }
これでES Lintは有効になっていますが、Prettierによるautofixがまだ有効になってないので、最後にVS Codeのsettings.jsonを修正します。
{
    "editor.formatOnSave": false,
    "editor.codeActionsOnSave": {
        "source.fixAll.eslint": true
    },
    "eslint.validate": [
        "javascript",
        "typescript",
        "vue",
    ]
}
これで設定完了です。大量にerrorやwarningがでますが、ファイル開いて保存し直すとautofixされて綺麗なコードになります。
メモ表示・編集画面を作成
マテリアルデザインのVue用UIライブラリであるVuetifyを使って画面を作っていこうと思います。
Vuetifyを導入
こちらにしたがって導入をします。
VuetifyのUI Componentを利用する箇所で毎回moduleをimportせず、自動的にimportしてくれるvuetify-loaderを利用するケースについて記載しています。
依存ライブラリを追加して、
npm install --save vuetify
npm install --save-dev sass sass-loader fibers deepmerge -D
npm install --save-dev vuetify-loader
npm install --save @mdi/font -D # Material Design Iconsを使う場合webpack.config.jsのrulesとpluginsを変更します。
+const VuetifyLoaderPlugin = require('vuetify-loader/lib/plugin')

 const config = {
   module: {
     rules: [
       {
-        test: /\.css$/,
-        use: [MiniCssExtractPlugin.loader, 'css-loader'],
-      },
-      {
-        test: /\.scss$/,
-        use: [MiniCssExtractPlugin.loader, 'css-loader', 'sass-loader'],
-      },
-      {
-        test: /\.sass$/,
-        use: [MiniCssExtractPlugin.loader, 'css-loader', 'sass-loader?indentedSyntax'],
+        test: /\.(css|scss|sass)$/,
+        use: [
+          'vue-style-loader',
+          'css-loader',
+          {
+            loader: 'sass-loader',
+            // Requires sass-loader@^7.0.0
+            options: {
+              implementation: require('sass'),
+              fiber: require('fibers'),
+              indentedSyntax: true // optional
+            },
+            // Requires sass-loader@^8.0.0
+            options: {
+              implementation: require('sass'),
+              sassOptions: {
+                fiber: require('fibers'),
+                indentedSyntax: true // optional
+              },
+            },
+          },
+        ],
       },
     ]
   },
   plugins: [
+     new VuetifyLoaderPlugin(),
   ],
}また、/src/plugins/にvuetify.tsファイルを作成します。Material Design Iconsを使う場合の設定になってます。
import '@mdi/font/css/materialdesignicons.css' // mdiのiconを使う場合
import Vue from 'vue'
import Vuetify from 'vuetify/lib'

Vue.use(Vuetify)

export default new Vuetify({
  icons: { // mdiのiconを使う場合
    iconfont: 'mdi',
  },
})このままだと、Could not find a declaration file for module 'vuetify/lib'. と怒られるので、tsconfig.jsonのcompilerOptionsに以下の設定を追加します。
{
  "compilerOptions": {
+    "types": [
+      "vuetify"
+    ],
  }
}
ここまでで一旦Vuetifyそのものの導入は完了です。
メモ表示・編集画面を作成
この時点では、以下のような画面を作成しました。
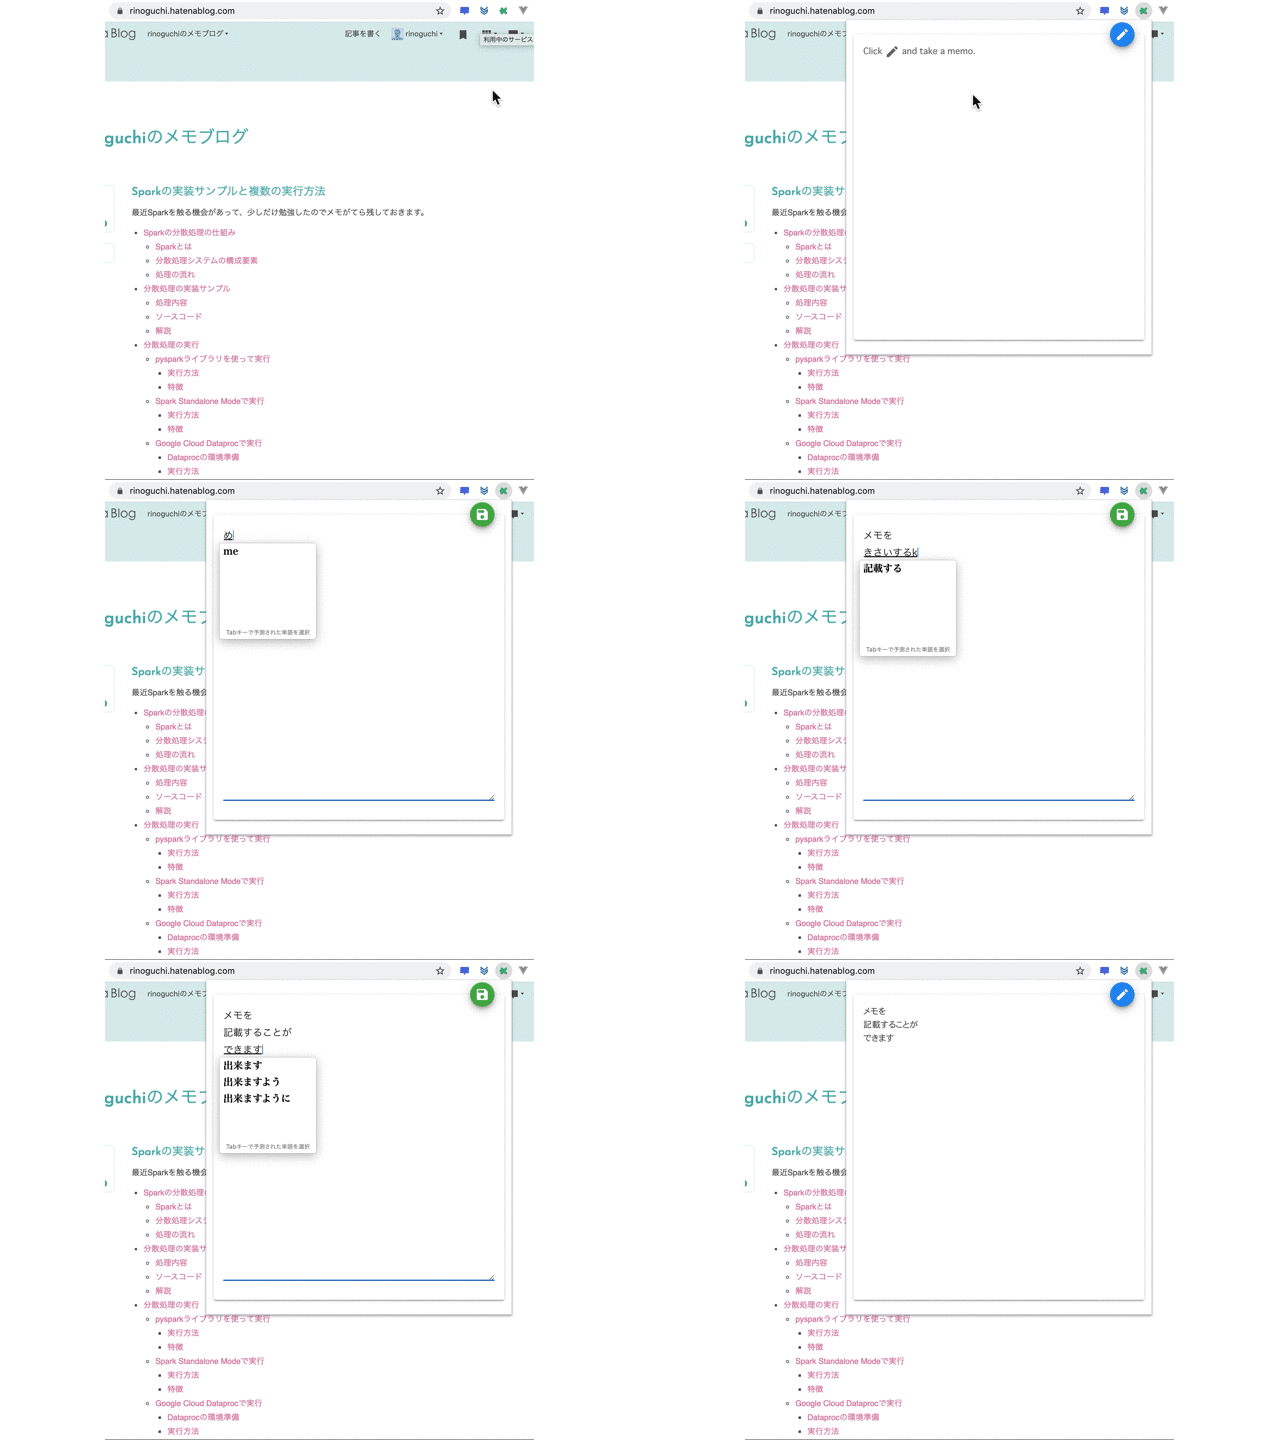
/src/components/にMemo.vueを作成し、Vueコンポーネントを作ります。
VuetifyのUIコンポーネントを使って作成してます。シンプルな内容なので見ればわかると思います。
<template>
  <v-container fluid>
    <v-row>
      <v-col cols="12">
        <v-card height="500">
          <v-card-text>
            <template v-if="memo">
              <div v-show="editing">
                <v-form v-show="editing">
                  <v-textarea
                    v-model="memo.body"
                    full-width
                    rows="16"
                    dense
                    filled
                    no-resize
                    placeholder="Input memo here."
                  />
                </v-form>
              </div>
              <div v-show="!editing">
                <pre v-show="memo.body">{{ memo.body }}</pre>
                <pre v-show="!memo.body">
Click <v-icon>mdi-pencil</v-icon> and take a memo.
                </pre>
              </div>
              <v-btn
                small
                fab
                absolute
                top
                style="right: 60px;"
                color="info"
                :disabled="editing"
                @click="handleEditBtn"
              >
                <v-icon>mdi-pencil</v-icon>
              </v-btn>
              <v-btn
                small
                fab
                absolute
                top
                right
                color="success"
                :disabled="!editing"
                @click="handleSaveBtn"
              >
                <v-icon>mdi-content-save</v-icon>
              </v-btn>
            </template>
          </v-card-text>
        </v-card>
      </v-col>
    </v-row>
  </v-container>
</template>

<script lang="ts">
import { Component, Prop, Vue } from 'vue-property-decorator'

class MemoModel {
  id: string | null = null
  body = ''
  mode = 'plane' // TODO: 将来的にmarkdownやwysiwygを選べるように
}

@Component
export default class Memo extends Vue {
  @Prop() private uid!: string // この時点では使わない
  @Prop() private url!: string // この時点では使わない
  private memo: MemoModel | null = null
  private editing = false

  created(): void {
    this.memo = new MemoModel() // TODO: DBから取得
  }

  handleEditBtn(): void {
    this.editing = true
  }

  handleSaveBtn(): void {
    this.editing = false
    // TODO: DBに保存
  }
}
</script>最後に、/src/popup/のApp.vueで先ほど作成したMemoコンポーネントを利用するように変更します。<v-app>配下でVuetifyコンポーネントが使えます。
 <template>
-  <p>{{ message }}</p>
+  <v-app>
+    <Memo :uid="'dummy'" :url="'dummy'" />
+  </v-app>
 </template>

 <script lang="ts">
 import { Component, Vue } from 'vue-property-decorator'
+import Memo from '../components/Memo.vue'

-@Component
+@Component({
+  components: { Memo }
+})
 export default class App extends Vue {
-  message = 'Hello world with TypeScript!'
 }
 </script>
Firebase AuthenticationでGoogle OAuth認証
メモの内容をユーザ毎にCloud Firestoreに保存したいと思います。そのためにはFirebase Authenticationで認証を行う必要があります。Chrome拡張なのでGoogle OAuth認証を利用することにしました。
処理の流れ
hrome拡張+FirebaseでGoogle認証するいくつかの方法 でも書いたのですが、色々な方法があって悩みましたが、こちらのサイトの方法がポップアップ画面も表示されず、ユーザ体験が一番スマートだと思うので、これを採用させてもらいました。
具体的には、ポップアップページのcreatedフックで、chrome.identity APIを使ってaccess tokenを取得し、access tokenを元にFirebase Authenticationを使ってGoogle OAuth認証を行う形です。
Firebaseコンソールでの設定
- Firebase プロジェクト作成
- こちらから作成します。とりあえず、Google AnalyticsはOFFにしました。
- アプリを登録
- Firebaseコンソールの
プロジェクトの概要ページのWEBアイコン(<>)からアプリを登録します。Hostingは今回利用しないのでOFFにしました。
- Firebaseコンソールの
- Google ログインを有効化
- Firebaseコンソールの Authentication -> Sign-in method で Google を有効にします
- Chrome拡張を承認済みDomainに追加
-
こちらに書いてある通り、Authentication -> Sign-in method -> 承認済みドメイン に
chrome-extension://CHROME_EXTENSION_IDの形式でドメインを追加します -
CHROME_EXTENSION_IDはChrome拡張の管理ページで確認できます
-
こちらに書いてある通り、Authentication -> Sign-in method -> 承認済みドメイン に
アプリでFirebaseを使えるようにする
こちらをみながら作業を進めます。
まずはライブラリを追加します
npm install --save firebase次に/src/plugins/にfirebase.tsを追加します。firebaseConfigの設定内容は、Firebaseコンソールで プロジェクトの概要 -> 対象のアプリ のSetting画面を開くとその中ほどに表示されているので、それをコピペします。
Firebase側で承認済みドメインを設定しているものの、ソースコード上にapiKeyが露出していることに不安を感じますが、こちらを参照すると大丈夫なようです。ただし、Firestoreを使う時にはセキュリティルールをちゃんと設定する必要はありそうです。
import * as firebase from 'firebase/app'
import 'firebase/auth'
import 'firebase/firestore'

const firebaseConfig = {
  apiKey: 'xxxxx',
  authDomain: 'xxxxx.firebaseapp.com',
  databaseURL: 'https://xxxxx.firebaseio.com',
  projectId: 'xxxxx',
  storageBucket: 'xxxxx.appspot.com',
  messagingSenderId: 'xxxxx',
  appId: 'xxxxx'
}

firebase.initializeApp(firebaseConfig)

export default firebase最後に、webpack.config.js内でbuild時にcontent_security_policyを上書きする処理があるので、そこを書き換えます。(vue-web-extensionを使っていない場合は、このwebpack.config.jsの処理は存在しないので、manifest.jsonを直接書き換えれば良いです)
     if (config.mode === 'development') {
-      jsonContent['content_security_policy'] = "script-src 'self' 'unsafe-eval'; object-src 'self'";
+      jsonContent['content_security_policy'] = "script-src 'self' https://apis.google.com 'unsafe-eval'; object-src 'self'";
+    } else {
+      jsonContent['content_security_policy'] = "script-src 'self' https://apis.google.com; object-src 'self'";
     }
ここまでで、Firebaseの機能をアプリ内で使うことができるようになりました。
OAuth クライアントIDを作成
こちらから、
- 認証情報を作成
- OAuth クライアントID
- Chrome アプリ
- アプリケーションIDにCHROME_EXTENSION_IDを指定
を行い、OAuth クライアントIDを作成します。
manifest.jsonに設定追加
さらに、manifest.jsonの記述を追加して、chrome.identity APIとOAuth2認証を有効にします。
認証とは直接関係ないのですが、後ほど開いているタブのURLを取得する必要があるので、chrome.tabs APIも有効にしています。
利用可能なchromeのAPIの種類はこちらを、Google OAuth2 認証のスコープはこちらを参照ください。
+  },
+  "permissions": [
+    "identity",
+    "tabs"
+  ],
+  "oauth2": {
+    "client_id": "********************************.apps.googleusercontent.com",
+    "scopes": ["https://www.googleapis.com/auth/userinfo.email"]
   }
}ちなみに、manifest.jsonに"key"を指定すると、Chrome拡張のIDを固定することができるらしく、こちらのサイトでもそうしろと書いてあるのですが、webpack-extension-reloaderとの相性が良くないらしくどんどん新しく別IDのChrome拡張がChromeに登録されていくので、自分は設定していません。
認証処理を追加
まずは、chrome.identityを利用するため、chromeモジュールの型定義を追加して
npm install --save-dev @types/chrometsconfig.jsonに以下を追記します。
     "types": [
-      "vuetify"
+      "vuetify", "chrome"
],最後に、/src/popup/のApp.vueを以下のように修正し、ポップアップページで認証を行うようにしました。
- uidが取得できてなければ(=未認証なら)ローディングiconを表示する
- createdフックで、chrome.tabs APIを使って開いているタブのURLを取得し、さらに、
firebase.auth().onAuthStateChangedを使ってFirebase Authenticationの認証状態を監視スタートした上で、実際の認証処理(startAuth)を実行する -
startAuthの中では、まずchrome.identity.getAuthTokenでaccess tokenを取得する(もしブラウザがGoogleログインしてない状態であればGoogle認証画面が別タブで表示され、Google認証を行った上で、access tokenを取得する)。取得したaccess tokenを元にFirebaseログインを実行する<template> <v-app> - <Memo :uid="'dummy'" :url="'dummy'" /> + <template v-if="uid && url"> + <Memo :uid="uid" :url="url" /> + </template> + <template v-else> + <v-container fluid> + <v-row> + <v-col cols="12" class="text-center"> + <v-progress-circular + :size="100" + :width="15" + color="grey" + indeterminate + /> + </v-col> + </v-row> + </v-container> + </template> </v-app> </template> <script lang="ts"> import { Component, Vue } from 'vue-property-decorator' import Memo from '../components/Memo.vue' +import firebase from '../plugins/firebase' + @Component({ components: { Memo } }) export default class App extends Vue { - message = 'Hello world with TypeScript!' + private uid: string | null = null + private url: string | null = null + + created(): void { + chrome.tabs.getSelected((tab: chrome.tabs.Tab) => { + if (!tab.url) { + throw new Error('Could not get tab url.') + } + this.url = encodeURIComponent(tab.url.split(/[?#]/)[0]) + }) + + firebase.auth().onAuthStateChanged((authUser: firebase.User | null) => { + if (authUser === null) { + this.uid = null + } else { + this.uid = authUser.uid + } + }) + + this.startAuth(true) + } + + startAuth(interactive: boolean): void { + chrome.identity.getAuthToken( + { interactive: !!interactive }, + (token: string) => { + if (chrome.runtime.lastError && !interactive) { + console.log('It was not possible to get a token programmatically.') + } else if (chrome.runtime.lastError) { + console.error(chrome.runtime.lastError) + } else if (token) { + const credential = firebase.auth.GoogleAuthProvider.credential( + null, + token + ) + firebase + .auth() + .signInWithCredential(credential) + .catch((error: any) => { + if (error.code === 'auth/invalid-credential') { + chrome.identity.removeCachedAuthToken({ token: token }, () => { + this.startAuth(interactive) + }) + } + }) + } else { + console.error('The OAuth Token was null') + } + } + ) + } } </script>
これでやっとFirebase Authenticationを使ってGoogle OAuth認証を行うことができました。
Firestoreにデータ保存
Cloud Firestoreにデータを保存するようにしたいと思います。LocalStorageやIndexedDBに保存するかはだいぶ迷ったのですが、同じGoogleアカウントで別マシンでも利用できるようにしたいので、Firestoreにすることにしました。
データモデル
こちらを参照しつつデータモデルを決めました。usersの下にmemosが位置するようなシンプルな形です。
documentとは値にマッピングされるフィールドを含む軽量なレコード、collectionとはdocumentのコンテナです。documentの中にsub collectionを持つこともできます。
collection: users // ユーザを格納するcollection
┣ document id: "xxxxx1"
┗ document id: "xxxxx2" // Google OAuth認証で取得したuidをdocument idとして利用
  ┣ defaultMode: "plain" // デフォルトの記載モード。いずれmarkdownやwysiwygモードを追加予定
  ┗ sub collection: memos // メモを格納するsub_collection
    ┣ document id: "https%3A%2F%2Fhoge.com"
    ┗ document id: "https%3A%2F%2Ffuga.com" // エンコードしたURLをidとして利用
      ┣ mode: "plain": // 記載モード
      ┗ body: "xxxxx" // メモ本文
データベース作成
こちらを参考に設定をしました。
まずコンソールから先ほど作成したプロジェクトを選択し、Databaseセクションでデータベースの作成を行います。
その際、セキュリティルールは本番環境で開始、ロケーションはasia-east2を選択することにします。
セキュリティルールで本番環境で開始を選んだ場合、常にread/writeできない設定になっていますので、こちらを参考に、Authenticationで認証したuidに紐づくメモだけをread/writeできるようにセキュリティルールを変更しました。
- ワイルドカード変数には該当するdocumentのIDがセットされるので、
uidにはuser documentのIDがセットされます -
request変数にはクライアントからのリクエスト情報がセットされます。request.authには認証済みであれば認証情報がセットされます - 今回使っていませんが、
resource変数には、データベースのデータの中身がセットされますので、documentのID以外のプロパティと何か比較する場合は利用することになりそうです。rules_version = '2'; service cloud.firestore { match /databases/{database}/documents { match /users/{uid} { allow create: if request.auth.uid != null; allow read, update, delete: if request.auth.uid == uid; } match /users/{uid}/memos/{memo} { allow read, create, update, delete: if request.auth.uid == uid; } } }
User Documentが存在しなかったらデータ追加
認証が完了した際に、User Documentが存在しなかったら追加するようにします。ポップアップページで認証を行なっているので、/src/popupのApp.vueに処理を組み込んでいきます。
- ログインユーザのuidを元にUser Documentを検索し、存在しなかったらデータを追加しています
- User情報を格納するための
UserModelクラスとUser DocumentにアクセスするためのUserRepositoryクラスを作成しています。個人的にはこの辺はクラス化しておいた方が責務が明確になり見通しがよくなる気がします。将来的には別ディレクトリに移動するかもしれません -
UserRepositoryクラスは、User Documentを参照するためのDocumentReferenceを通じて、Documentを取得したり保存したりする関数を提供します。DocumentReference.set()関数は、データが存在しなければ追加、存在すれば更新してくれるのが便利です -
API呼び出し系は基本どれも非同期で動くため、callbackのnestが気になってくるので、async、awaitを使って同期的に呼び出す形にしてあります
 <template>
   <v-app>
-    <template v-if="uid && url">
-      <Memo :uid="uid" :url="url" />
+    <template v-if="user && user.id && url">
+      <Memo :uid="user.id" :url="url" />
     </template>
     <template v-else>
(中略)
 import firebase from '../plugins/firebase'
+import DocumentReference = firebase.firestore.DocumentReference
+import DocumentData = firebase.firestore.DocumentData
+import DocumentSnapshot = firebase.firestore.DocumentSnapshot

+class UserModel {
+  id: string | null = null
+  defaultMode = 'plane' // TODO: 将来的にmarkdownやwysiwygを選べるように
+}
+
+class UserRepository {
+  userRef: DocumentReference<DocumentData>
+  constructor(uid: string) {
+    this.userRef = firebase.firestore().collection('users').doc(uid)
+  }
+
+  async get(): Promise<UserModel> {
+    return this.userRef
+      .get()
+      .then((userData: DocumentSnapshot<DocumentData>) => {
+        const user = new UserModel()
+        if (userData.exists) {
+          user.id = userData.id
+          user.defaultMode = userData.get('defaultMode')
+        }
+        return user
+      })
+      .catch((error: any) => {
+        throw new Error(`Error getting user:, ${error}`)
+      })
+  }
+
+  async save(user: UserModel): Promise<UserModel> {
+    return this.userRef
+      .set({
+        defaultMode: user.defaultMode,
+      })
+      .then(() => {
+        console.log('User successfully saved!')
+        return this.get()
+      })
+      .catch((error: any) => {
+        throw new Error(`Error saving memo:, ${error}`)
+      })
+  }
+}

 @Component({
   components: { Memo },
 })
 export default class App extends Vue {
-  private uid: string | null = null
+  private user: UserModel | null = null
   private url: string | null = null

-  created(): Promise<void> {
+  async created(): Promise<void> {
     chrome.tabs.getSelected((tab: chrome.tabs.Tab) => {
       if (!tab.url) {
         throw new Error('Could not get tab url.')
       }
       this.url = encodeURIComponent(tab.url.split(/[?#]/)[0])
     })

-    firebase.auth().onAuthStateChanged((authUser: firebase.User | null) => {
+    firebase.auth().onAuthStateChanged(async (authUser: firebase.User | null) => {
       if (authUser === null) {
-         this.uid = null
+         this.user = null
       } else {
-         this.uid = authUser.uid
+        const userRepository = new UserRepository(authUser.uid)
+        this.user = await userRepository.get()
+        if (!this.user.id) {
+          await userRepository.save(this.user)
+        }
+      }
     })
Memo Documentを取得および保存
メモ画面Memo.vueも似たような感じで処理を追加していきます。
-
createdフックでFirestoreからメモデータを取得し、保存ボタンがクリッククリックされたらデータを保存します。 -
Userの場合と同様に
MemoModelとMemoRepositoryを作成して、それらを利用してMemoの取得や保存を行うようにします。<script lang="ts"> import { Component, Prop, Vue } from 'vue-property-decorator' +import firebase from '../plugins/firebase' +import DocumentReference = firebase.firestore.DocumentReference +import DocumentData = firebase.firestore.DocumentData +import DocumentSnapshot = firebase.firestore.DocumentSnapshot (中略) +class MemoRepository { + memoRef: DocumentReference<DocumentData> + constructor(uid: string, url: string) { + this.memoRef = firebase + .firestore() + .collection('users') + .doc(uid) + .collection('memos') + .doc(url) + } + + async get(): Promise<MemoModel> { + return this.memoRef + .get() + .then((memoData: DocumentSnapshot<DocumentData>) => { + const memo = new MemoModel() + if (memoData.exists) { + memo.id = memoData.id + memo.body = memoData.get('body') + memo.mode = memoData.get('mode') + } + return memo + }) + .catch((error: any) => { + throw new Error(`Error getting memo:, ${error}`) + }) + } + + async save(memo: MemoModel): Promise<MemoModel> { + return this.memoRef + .set({ + body: memo.body, + mode: memo.mode, + }) + .then(() => { + console.log('Memo successfully saved!') + return this.get() + }) + .catch((error: any) => { + throw new Error(`Error saving memo:, ${error}`) + }) + } +} @Component export default class Memo extends Vue { @Prop() private uid!: string @Prop() private url!: string private memo: MemoModel | null = null private editing = false + private memoRepository: MemoRepository = new MemoRepository( + this.uid, + this.url + ) - created(): void { - this.memo = new MemoModel() // TODO: DBから取得 + async created(): void { + this.memo = await this.memoRepository.get() } handleEditBtn(): void { this.editing = true } handleSaveBtn(): void { this.editing = false - // TODO: DBに保存 + if (this.memo) this.memo = await this.memoRepository.save(this.memo) } } </script>
不正アクセステスト
ポップアップ画面を表示した際の、createdフックで自分以外のuid(test_user)にアクセスする実装を書いてみて動作させて、セキュリティルールが機能しているか確かめたいと思います。
  created(): void {
    firebase
      .firestore()
      .collection('users')
      .doc('other users uid')
      .get()
      .then((doc) => {
        console.log(doc)
      })
      .catch((error: any) => {
        console.log('Error getting document:', error)
      })
  }
上記実装して、画面を表示したところ、ちゃんと権限が足りないというエラーメッセージが出力されましたので、大丈夫そうです。
Error getting document: FirebaseError: Missing or insufficient permissions.
Chrome拡張の公開
ここまでで最低限の機能はできたので、Chrome Web Storeに公開することにしました。公開手順については、別で記事を起こしましたので、そちらを参照ください。
Chrome ExtensionをWeb Storeに公開する
トラブルシューティング
上記の記事では解決後の結果だけ書いてますが、解決に時間がかかったやつはエラーの内容や原因も含めてまとめておきます。
.vue モジュールがNot Foundになってしまう
TS2307: Cannot find module './App.vue'
import App from './App.vue'のような感じで.vueファイルをimportしようとするとmoduleが見つからないというエラーが発生します。これはts-loaderが.vueをtsファイルとして認識させるようにすれば良いみたいす。
こちらを参考にwebpack.config.jsに
  module: {
    rules: [
      {
        test: /\.ts$/,
        loader: "ts-loader",
        options: { appendTsSuffixTo: [/\.vue$/] },
        exclude: /node_modules/
      }
    ]
  }
のように実装すると今度は、次のエラーが発生します。
Error: options/query provided without loader (use loader + options)
loaderとoptionsを一緒に指定する必要があるっぽいです。useを使って以下のようにloaderとoptionsをまとめてセットすると回避できました。
  module: {
    rules: [
      {
        test: /\.ts$/,
        use: [
          {
            loader:'ts-loader',
            options: {
              appendTsSuffixTo: [/\.vue$/]
            }
          }
        ],
        exclude: /node_modules/
      }
    ]
  }
VS Code上のエラーが消えない
上記対応をすると、アプリケーションは正常に動くようになるのですが、VS Code上のエラーが消えてくれません。

これを解決するために、型定義ファイルshims-vue.d.tsを作成しました。
declare module '*.vue' {
  import Vue from 'vue'
  export default Vue
}
content_security_policyの設定がおかしくてChrome拡張から外部スクリプトを読み込めない
manifest.jsonに
"content_security_policy": "script-src 'self' https://apis.google.com/; object-src 'self'",と記載しているにも関わらず、以下のエラーが発生しました。
Refused to load the script 'https://apis.google.com/js/api.js' because it violates the following Content Security Policy directive: "script-src 'self' 'unsafe-eval'". Note that 'script-src-elem' was not explicitly set, so 'script-src' is used as a fallback.実際動いているものはどうなってるのかと、npm run build:devで/dist/にcopyされたmanifest.jsonを参照すると、なんと
"content_security_policy": "script-src 'self' 'unsafe-eval'; object-src 'self'"に置き換わってしまっていました。
誰がこれを置き換えているのかというと、webpack.config.jsの
if (config.mode === 'development') {
  jsonContent['content_security_policy'] = "script-src 'self' 'unsafe-eval'; object-src 'self'";
}
という処理だったので、いらんことするな!とこの処理を消してみると今度は
Uncaught EvalError: Refused to evaluate a string as JavaScript because 'unsafe-eval' is not an allowed source of script in the following Content Security Policy directive: "script-src 'self' https://apis.google.com".という別のエラーが発生します。developmentモードでは文字列をevalしてるみたいです。
というわけで最終的には、manifest.jsonからはcontent_security_policyの設定は削除し、webpack.config.jsを以下のように書き換え、developmentモードではevalを許可するようにました。
if (config.mode === 'development') {
  jsonContent['content_security_policy'] = "script-src 'self' https://apis.google.com 'unsafe-eval'; object-src 'self'";
} else {
  jsonContent['content_security_policy'] = "script-src 'self' https://apis.google.com; object-src 'self'";
}ちなみに、content_security_policyの設定の仕方はこちらがわかりやすかったです。script-src 'self' https://apis.google.com 'unsafe-eval';の部分は、scriptのsourceは、以下の三つを許可するというような意味になります。
-
self: 自分自身(同一オリジン)が提供するsource -
https://apis.google.com: このドメインが提供するsource -
unsafe-eval: eval()を使って文字列からsource codeを作る
webpack-extension-reloaderでChromeExtensionをリロードする際にbackground.jsでWebSocket 接続エラー
ISSUEにも上がっているのですが以下のようなエラーが発生します。
WebSocket connection to 'ws://localhost:9090/' failed: Error in connection establishment: net::ERR_CONNECTION_REFUSED
npm run watch:devでビルドしたbackground.jsには、Chrome側でws://localhost:9090を監視して、変更があったら拡張をリロードするような処理が組み込まれているのですが、npm run watch:devを停止している時はws://localhost:9090も停止するため、上記のエラーが発生します。なのでこのエラーは気にしなくて大丈夫です。
ちなみに、npm run build:devでビルドしたコードには、上記の監視処理は含まれないのでこのエラーは発生しません。
バンドルサイズが大きすぎる
本番用コードをnpm run buildで出力したところ、バンドルサイズが大きすぎるよという警告が出ましので、バンドルサイズを削減する必要があります。
WARNING in asset size limit: The following asset(s) exceed the recommended size limit (244 KiB). This can impact web performance.
WARNING in entrypoint size limit: The following entrypoint(s) combined asset size exceeds the recommended limit (244 KiB). This can impact web performance.
こちらに関しては、長くなるので別記事でまとめました。
Vue+Firebaseで作ったフロントエンドアプリのバンドルサイズを削減する
TS2705: An async function or method in ES5/ES3 requires the 'Promise' constructor. Make sure you have a declaration for the 'Promise' constructor
こちらを参考に、tsconfig.jsonに以下の設定を加えることでエラーが出なくなりました。
{
  "compilerOptions": {
    "lib": [
      "es2015"
    ]
  }
}また、この対応をしたところ、console.log()を使っている箇所で
TS2584: Cannot find name 'console'. Do you need to change your target library? Try changing the `lib` compiler option to include 'dom'.という別のエラーが出るようになったため、domもlibに追加しました。
{
  "compilerOptions": {
    "lib": [
      "es2015", "dom"
    ]
  }
}オプションページでのcolorがおかしい
この記事ではオプションページについて書いてないのですが、vuetifyの
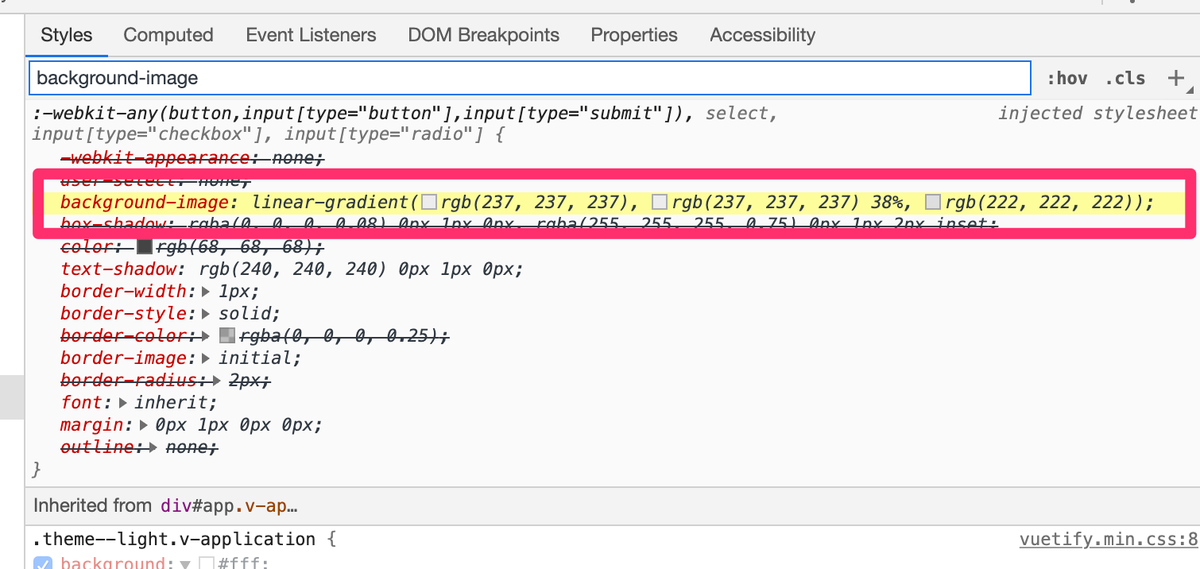
のように、injected stylesheetでbackground-image が指定されているのが原因でした。
で、このstylesheetをinjectしている箇所を探したところ、manifest.jsonのオプションページの設定のchrome_style: trueが犯人でした。
  "options_ui": {
    "page": "options/options.html",
    "chrome_style": true
},この設定はchromeっぽい外観にしたい場合に設定するものでデフォルトはfalseらしいのですが、vue-web-extensionを使った場合trueが設定されます。少なくともvuetifyとは相性がよくないことが判明したので、falseに設定し問題を解決しました。
関連記事
コアな部分を作り込みながらこの記事を書いていたのですが、その後ブラッシュアップしていく中で、別記事を起こしたものがありますので、紹介しておきます。
- Chrome ExtensionをWeb Storeに公開する
- Firestoreのコストリスク削減
- IndexedDBをつかうならDexie.jsが便利
- VuetifyのリセットCSSの影響範囲をVuetify適用範囲内に限定する
- Vue+Firebaseで作ったフロントエンドアプリのバンドルサイズを削減する
- typescriptプロジェクトにreCAPTCHA v2 & v3を導入
さいごに
今回、開発・公開したChrome拡張は、ここに記載したものから多少機能追加していますが、根幹の部分は説明できたかなと思います。(ソースは思わぬ脆弱性とか見つけられて攻撃されると怖いので、公開しません。)
Chrome拡張+Firebaseを使うことでフロントエンドサーバもバックエンドサーバも不要になり、サーバレスでサービスを構築できたことは非常にありがたかったです。Vue + Vuetifyも特に違和感なく使いやすかったですし、今回の技術選定は結構あたりだったかな、と思います。