ドキュメント
特徴
Denoは、V8エンジンおよびRustで組まれた JavaScript と TypeScriptのランタイムで、Node.js を作成したライアン・ダール氏が、Node.js での後悔を改善する形で作成されたものらしいです。(詳しくは、こちら)
特徴としては以下が挙げられています。
- セキュアである
- 明示的にしない限り、ファイル・ネットワーク・環境へアクセスできない
- 何もしなくても TypeScriptをサポートする
- 単一の実行ファイルをリリースする
- 依存関係インスペクタ(deno info)やコードフォーマッター(deno fmt)が組み込みユーティリティとして提供されている
- レビュー・動作確認済みの標準ライブラリが Deno Land で提供されている
インストール
brew install deno
deno upgrade --version 1.8.1
deno info
> DENO_DIR location: "/Users/xxx/Library/Caches/deno"
> Remote modules cache: "/Users/xxx/Library/Caches/deno/deps"
> TypeScript compiler cache: "/Users/xxx/Library/Caches/deno/gen"
アップグレードしておかないと、VS Codeのプラグインがうまく動いてくれません。
利用可能なバージョンは、こちらで確認できます。
動かしてみる
hello deno!をプリント
まずは hello deno!という文字をプリントするだけの、hello.ts を実装します。
console.log('hello deno!');実行するとうまくプリントされました。
deno run hello.ts
> Check file:///Users/xxx/workplace/deno_samples/src/hello.ts
> hello deno!
hello deno!を返すWebサーバ
hello deno!と表示されたページを返すだけのWebサーバを立てる、webserver.ts を実装します。
import { serve } from "https://deno.land/std@0.91.0/http/server.ts";

const server = serve({ hostname: "0.0.0.0", port: 8080 });
console.log("WEB server running on http://localhost:8080/");
for await (const request of server) {
  request.respond({ status: 200, body: "Hello Deno!" });
}
実行します。
deno run --allow-net webserver.ts
> Check file:///Users/xxx/workplace/deno_samples/src/webserver.ts
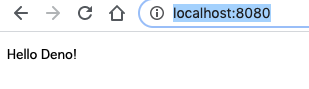
> web server running on http://localhost:8080/http://localhost:8080/ にアクセスするとちゃんとhello deno!と表示されました。
Google検索スクリプト
コマンドライン引数で指定したワードでGoogle検索し、結果をログに出力するだけの簡単なスクリプト(google_search.ts)を書いてみました。
文字列を読み込んで、Documentオブジェクトに変換するため deno-dom という thrid party モジュールをインポートしてます。
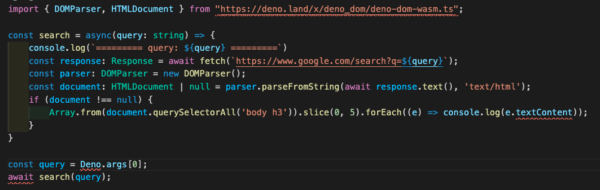
import { DOMParser, HTMLDocument } from "https://deno.land/x/deno_dom/deno-dom-wasm.ts";

const search = async(query: string) => {
    console.log(`========= query: ${query} =========`)
    const response: Response = await fetch(`https://www.google.com/search?q=${query}`);
    const parser: DOMParser = new DOMParser();
    const document: HTMLDocument | null = parser.parseFromString(await response.text(), 'text/html');
    if (document !== null) {
        Array.from(document.querySelectorAll('body h3')).slice(0, 5).forEach((e) => console.log(e.textContent));
    }
}

await search(Deno.args[0]);このスクリプトを、単純に以下のように実行すると、PermissionDeniedエラーが発生します。
特徴にもありましたが、Denoではデフォルトでネットワークアクセスが許可されてないためです。
deno run google_search.ts AAA
> Check file:///Users/xxx/workplace/deno_samples/src/google_search.ts
> error: Uncaught PermissionDenied: network access to "www.google.com", run again with the --allow-net flag
const response = await fetch(`https://www.google.com/search?q=${query}`);以下のように--allow-netを指定することで、無事実行できました。
deno run --allow-net="www.google.com" google_search.ts AAA
> ========= query: AAA =========
> AAA(トリプル・エー)OFFICIAL WEBSITE
> AAA
> AAA Party
> PROFILE | AAA(トリプル・エー)OFFICIAL WEBSITE
> AAA / 「LIFE」Music Video - YouTube
VSCodeの設定
Deno 拡張
上記のスクリプト、実はVS Code上でみるといくつかワーニングが出てます。
- An import path cannot end with a '.ts' extension. Consider importing 'https://deno.land/x/deno_dom/deno-dom-wasm' instead.ts(2691)
- Cannot find name 'Deno'.ts(2304)
- Top-level 'await' expressions are only allowed when the 'module' option is set to 'esnext' or 'system', and the 'target' option is set to 'es2017' or higher.ts(1378)
これは、linterが普通のtypescriptファイルとしてチェックしているためで、Denoのスクリプトとして認識させればワーニングは消えます。
まず、以下をインストールして、
以下のような .vscode/settings.json をプロジェクト直下に作成してあげればワーニングは消えます。
{
    "deno.enable": true
}プラグインを有効にすると、ワーニングが消えるだけでなく、Command + クリックで third party モジュールのソースコードに飛べるようになります。
deno lint
Deno には、deno lint という linter が標準で提供されています。
現状、ルールの設定やカスタマイズはできないみたいです。
上記ドキュメントに列挙されているルールが全て適用されます。
上記VSCode拡張をインストールした上で、.vscode/settings.json に以下のように設定してあげると、VSCode上で有効になります。
{
    "deno.enable": true,
    "deno.lint": true, // この設定を追加
}試しに、debugger;を追加してみたところ、ちゃんとワーニングが表示されました。

このワーニングを無視したい場合は、以下のようにdeno-lint-ignoreで対象のルールを無視するようにコメントしてあげれば良いです。
    // deno-lint-ignore no-debugger
    debugger;
また、コマンドラインで実行することもできます。
deno lint --unstable google_search.ts
> (no-debugger) `debugger` statement is not allowed
>     debugger;
>     ^^^^^^^^^
>     at /Users/xxx/workplace/deno_samples/src/google_search.ts:4:4
>     hint: Remove the `debugger` statement
> Found 1 problem
> Checked 1 file
deno fmt
Deno では、deno fmt というフォーマッターが標準で提供されています。
.vscode/settings.json に以下のように設定してあげると、VSCode上で有効になります。
{
    "deno.enable": true,
    "[typescript]": { // この設定を追加
        "editor.defaultFormatter": "denoland.vscode-deno",
        "editor.formatOnSave": true,
    },
}
また、コマンドラインで実行することもできます。
deno fmt
> /Users/xxx/workplace/deno_samples/src/google_search.ts
> Checked 2 files
所感
スクリプトを書く分には、Denoはとてもハードルが低いと感じました。おそらく、簡素なWebサーバを立てたりするのも大丈夫でしょう。
一方で、ほとんどのnpmパッケージはDenoでは動かないため、ニッチな要件への対応が必要な場合に、ライブラリが提供されておらず詰んでしまう懸念があります。例えば、Excel 出力するようなライブラリはDenoにはなさそうでした。
そういう意味で、お試しならいいものの、プロダクションで使うには不安感があり、「現時点ではスクリプトに利用するぐらいにとどめておいた方が無難かな」という感想でした。